ADLab Quail UI Automation Testing Library
Quail is software library created to help facilitate automation testing of WinForms applications. It’s written in C# and using Microsoft Workflow Foundation for creating and orchestrating testing scenarios.
Who is target audience for Quail
The primary audiences for ADLab Quail are .NET developers and advanced QA engineers working on .NET WinForms applications. Using Quail (as I will show below) requires some knowledge of .NET Framework and familiarity with C# programming language. It’s unlikely that Quail can be used by person who is not capable of minor programming, but if you have advanced tester in your team or your developers doing (even partially) testing themselves Quail can be great help. The level of programming knowledge required, however, far less that one needed to create unit tests.
Walkthrough
For demonstration purposes I will use one of free applications you can find on SourceForge.net, EggTimer, simple time tracking application. In order to use Quail application must be rebuild with added reference to Quail assembly (ADLab.Quail.dll) and some code to initiate load of designer. For example, I can add hidden menu, key combination or button, visible under certain conditions (i.e. only in debug build).
The code to start Quail is quite simple:
private void btnQuail_Click(object sender, EventArgs e)
{
	ADLab.Quail.Engine.RunDesigner(
    Path.Combine(Application.StartupPath, "workflow.xoml"));
}
The code creates and displays Quail Snapshot Designer and loads existing scenario.
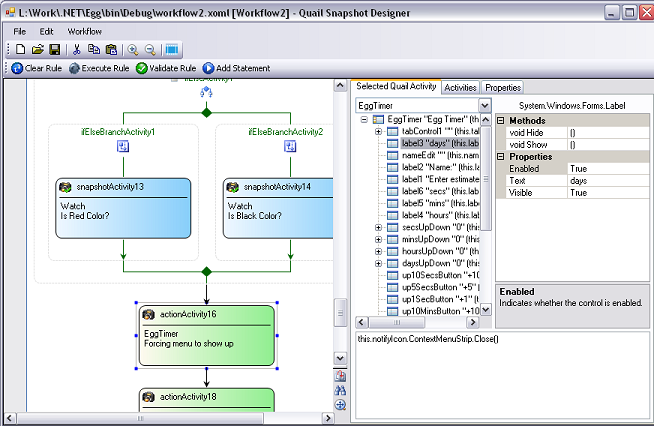
Designer contents Microsoft Workflow View and 3 tabs – with properties of selected activity
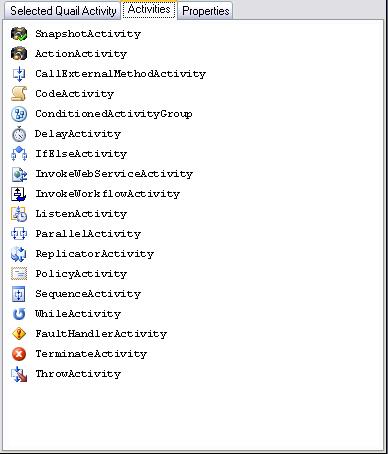
list of available types of activities
and special tab for editing custom Quail activities types. There are few different types, two very generic – Snapshot and Action, and more specialized like ClickButton.
Snapshot Testing
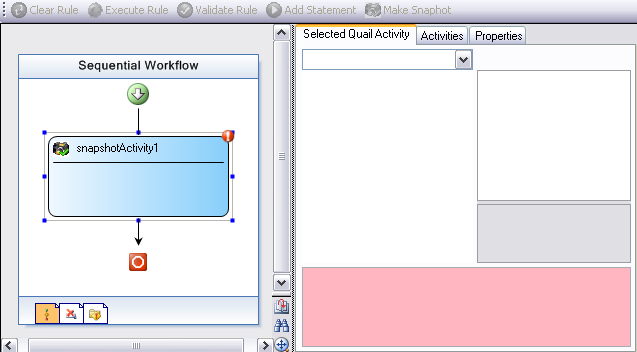
The idea behind Quail is to test software as a set of snapshots and actions. Snapshot is a frozen state of application, and action is a way to get from one snapshot to another. For example, when application started, certain menus, controls and buttons must have appropriate Visible, Enabled and other properties to set. In order to test it user will have to create snapshot in Quail designer to specify what controls needs to be tested and base on what criteria. Let’s create new Workflow and drop new Snapshot activity into designer:
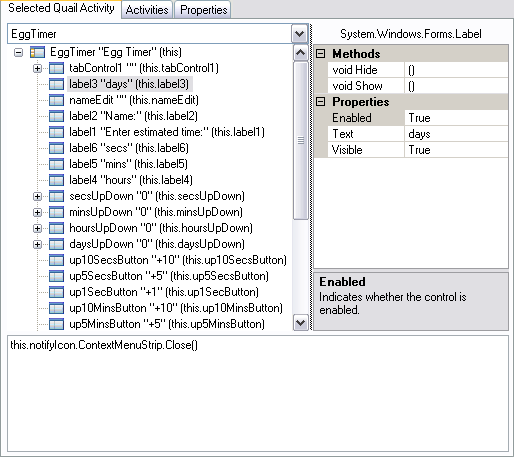
Now I need to select what control properties I want to be tested. You can do it by selecting one of the forms available in combo box, then navigate through treeview to control you are looking for. Quail has couple features to help you find controls – if this control can be focused (for example, it’s button), you can set focus to this control and then switch to Quail designer and use “Find Focused Control” command in tree view popup menu. Also, when you select control in a tree it’s highlighted on original form (working for visible controls only). Let’s say I want to be sure that by default our “Estimated time” label contents “0:00:00:00” text. After class “timeLabel” in treeview selected, you can select property of this class in a grid, in this case it’s Text. By default Quail shows only few, most often used properties and methods, but it can be changed by using popup menu and add properties, methods and classes to favorites. After property selected, click on “Add Statement” button on toolbar to add this criteria to snapshot. You will get something like “this.timerLabel.Text == “0:00:00:00″”.
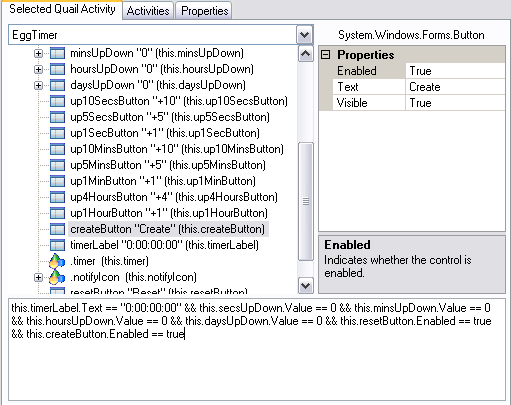
By selecting more components and properties you can build up any combination criteria, using any available C# operator, as long as final result of the equation is boolean. You can type text by hand, selecting components in a tree is not necessary, but done for convenience and speed, however selecting a form is required.
Another way to create criteria in a bulk is to use “Make Snapshot” command from activity toolbar. This function will loop through all objects in a treeview and add properties / values pairs to the criteria, honoring “Favorites Controls Only” and “Favorites Properties Only” menus checks. Here what you likely get as result of this command:
// this //
this.Text == "Egg Timer"
 &&
this.Enabled == true
 &&
this.Visible == true
 &&
this.Location.X == 22
 && this.Location.Y == 29
 &&
// this.tabControl1 //
this.tabControl1.Text == ""
 &&
this.tabControl1.Enabled == true
 &&
this.tabControl1.Visible == true
Keep in mind, that “Make Snapshot” command from toolbar will clear whatever code you currently have in text editor. If you want to add and not replace, right click on selected element in a tree and click on “Get Control Snapshot” menu. This add snapshot code to existing text in the editor.
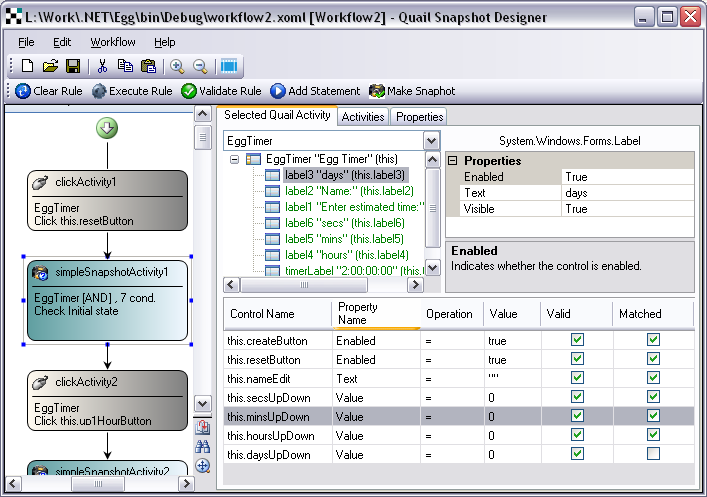
Another way to manage snapshots is to use SimpleSnapshotActivity. This activity is streamlined version of SnapshotActivity, and does not let you type conditions in a text editor. Instead, it using a grid to presend conditions in a simple list. Additional benefits of this activity, besides more user-friendly look, is that validation and execution in design time performed line-by-line, that let you easier troubleshoot and fix problems with your script.
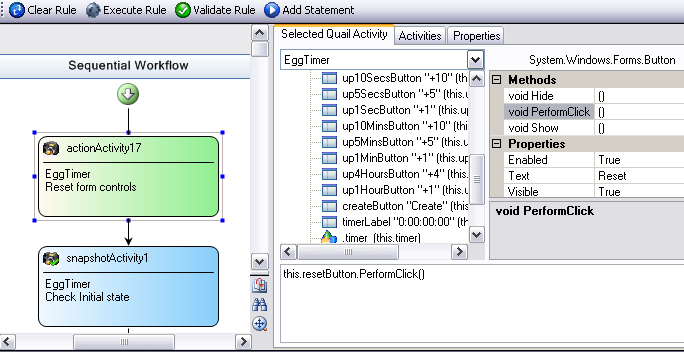
Now, let’s continue over test script (assuming you have one). Next thing I will do is to click on some buttons and check results. Drop “Action” activity on the designer after first one and select EggTimer form again, and then choose “up10MinsButton” in a tree. You will see that besides properties few methods are available as well. I need a “PerformClick” one. Select it and press “Insert” button. The end result in editor will be “this.up10MinsButton.PerformClick()”. Press “Execute” button (edit control flicks for a second indicates that script executed without error) and switch to “EggTimer” form. You will notice that UpDown minutes control now have “10” as a value instead of “0”. Next thing logically will be to drop Snapshot activity and put “this.minsUpDown.Value == 10” as a criteria.
Instead of using Action activity to call PerformClick() on the button, you can use ButtonClick activity for exact same effect. This type of activity won’t let you edit code, and won’t let you pick up any property or method. The only thing it let you is select button control in a tree and click “Set Button Click” item on toolbar.

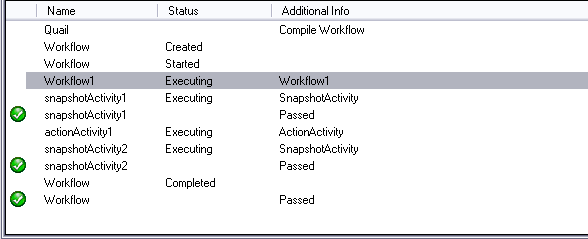
Now I can execute the script by pressing F5 or using form menu.
Requirements
In order to run Quail you will need a computer capable of running MS Visual Studio 2005, have VS 2005 installed, Microsoft .NET Framework 3.0
and Visual Studio 2005 extensions for .NET Framework 3.0
Downloads
You can download Quail Beta 2 here
Questions and answers
- How can I extend Quail for my needs?
- What settings can I manipulate with?
- How to deal with message boxes?
There are a few ways you can extend Quail to test specifics of your application. One, more complex is to create your own activities in Workflow Foundation and include them in list of activities in Quail Designer. Everything you need to know about custom activities you can find in MSDN. The second, simpler way is to create your own “helper” form. As you noticed there are initially 2 forms in combo box to choose from – main form and “Quail Helper”. This helper resides inside Quail library and created only to provide few methods that does not exists in .NET Framework. You can do the same – create new form, add public methods to it, be sure it’s created in runtime, have Owner set to main form of your app and handle is created as well (form not necessary needs to be visible but windows handle must be created. For example by calling code similar to this: if (!helper.IsHandleCreated) { helper.Handle.ToString();}. Then add class name of this form to list of helpers in application configuration file. This is necessary if you don’t want any other properties and methods of the form to be visible besides ones that you have created.
Open up ADLab.Quail.dll.config file and take a look. The application settings section pretty self-explained.
Set “Wait for completion” property of action that cause message to show to False (depends from function running in application you may need to increase “Delay after execution” as well. In next actions, you can use FindWindow or EndDialog functions of QuailHelper form. See sample script for details.
Hello,
This is a very cool tool.
I believe it could be useful for our functional tests.
It has some bugs which make me concerned about his usage. For example, I could not find any easy way to click on a MenuItem (File -> Exit). It seems that the treeview of controls does not allow me to click on a menu item.
I would also like to know how this tool could be used from a QA Tester perspective. Someone who does not have/need the source code of the application under test to develop his functional tests. I feel that this tool is more adapted to unit testing of Forms and less about functional testing.
Thanks
Tief
Ilya,
This looks interesting. How large is your user base? Is there a user forum anywhere. I’m concerned if I start using it, it will be difficult to get help and discuss ideas with other users.
Thanks
This is a very powerful tool and concept, however, when running against a complex app, I can’t get usefull snapshots, because of a RuleSyntaxExceptions due to
System.Reflection.TargetInvocationExceptions.
Any suggestions?